Schema generator

Full page schema in under 5 minutes

Enter your URL, let the generator read your page, then copy and paste the JSON-LD straight into your file or CMS — works with WordPress, Shopify, Squarespace, Wix or plain HTML.

1 / 9
STEP 1 / 9⤢ Click to zoomSchema generator step 1
Generate

Enter your URL and generate

Paste any page URL into the AI Schema Generator and hit Generate. It reads your title, meta description, H1, images and body content and builds complete, production-ready JSON-LD from what's actually on the page.

✓ No coding needed

Step by step

Want to really get into it? The full schema, part by part

Every stage of the generator up close. Tap any screenshot to open it full size.

1 / 1
PART 1 ⤢ Click to zoom Full schema, part 1: enter your URL and generate
Generate

Enter your URL and generate

Drop in any URL, pick auto-detect and how many of each type to build, then Generate. The AI reads your title, meta description, H1, OG image, canonical URL and body content, and builds complete, production-ready JSON-LD from your real content.

Schema & LLMs.txt for AEO — Generated in Under 5 Minutes

New users
Claim 100 points →

SEO, AEO & Schema: a plain-English guide to getting your pages noticed

Most sites are invisible to AI search engines because they are missing structured data — the behind-the-scenes labels that tell Google, ChatGPT and Perplexity exactly what your page is about. The good news: our AI Schema Generator fixes this in about two minutes. Enter your URL, fill in a few details about your business, hit Create — and it generates a complete, accurate schema file ready to add to your site. No coding. No guesswork. No other tool does this automatically from your actual page content. Follow the steps below to check what you are missing, generate your schema, and get your site noticed by both search engines and AI.

How is your website built? Pick yours to see the right instructions throughout the steps:

You edit HTML files directly in Notepad++ and upload them via FileZilla. The steps below use this method by default.
In WordPress, most changes are made via Appearance → Theme Editor (for header/footer code) or a plugin like Yoast SEO or Rank Math for titles, descriptions and schema. The steps below will note the WordPress equivalent for each action.
In Wix, edit page titles and descriptions via Pages → Page SEO. Add code (schema, llms.txt headers) via Settings → Custom Code. Wix handles most technical basics automatically but has limited control over advanced schema and server files like llms.txt — you may need a Wix Developer account for those.
In Squarespace, edit page titles and descriptions via Pages → Page Settings → SEO. Add custom code via Settings → Advanced → Code Injection. Squarespace doesn't allow direct file uploads for llms.txt — use the URL Mapping feature or a custom domain redirect as a workaround.
In Shopify, edit page titles and descriptions via Online Store → Pages → Edit SEO. Add custom code via Online Store → Themes → Edit Code (theme.liquid for header code). For llms.txt, add it to your theme's root or use a Shopify app.
You have hosting with a control panel (cPanel or Plesk). Use the File Manager inside your control panel to upload and edit files directly in your browser — no FTP program needed. Find it under Files → File Manager in cPanel, or Files in Plesk. For editing, use the built-in code editor or download, edit in Notepad++, and re-upload.
If you're not sure, check your hosting provider's documentation for how to upload files and edit page code. The audit tools work the same regardless of platform — the only difference is how you apply the fixes.
Step 1 — First, check what your site is missing

Before changing anything, run a quick check to see what structured data, schema markup and SEO signals your site already has — and what is missing. This takes about 60 seconds and tells you exactly where to focus your effort.

How to do it: Go to the Schema Debugger, enter your website URL and run the audit. It will show you which pages have missing or broken schema, which titles and descriptions need work, and which structured data signals are absent. Keep the results open — the steps below will walk you through fixing each one.

Open the Schema Debugger now →

Step 3 — What are we trying to do?

Three simple goals, in plain English:

  1. SEO helps Google find and rank your page.
  2. AEO (Answer Engine Optimisation) helps AI answer engines like ChatGPT and Perplexity quote your page.
  3. Schema is a hidden label on your page that tells both of them exactly what your page is (a business, an article, a product, and so on).

You do not need to understand the theory. Each step below uses one of our tools to check one thing and hands you the exact fix to paste in.

Step 4 — A proper title and description

Your title is the blue headline Google shows in search results; your description is the grey summary underneath it. Here is how to check and fix yours:

  1. Open the Meta Analyzer.
  2. Paste your page's web address (for example yourdomain.com/about.html) into the box and run the check.
  3. It shows your current title and description, how long each is, and a tick or a cross. A cross means it is too long, too short, or missing — and it gives you a better version to use. Copy the suggested title and description.
  4. Open your page in Notepad++. Press Ctrl+F, type <title> and press Enter to jump to it. Replace the words between <title> and </title> with your new title.
  5. Just below it, find the line that starts <meta name="description" and replace the words inside content="…" with your new description.
  6. Save with Ctrl+S, then upload the page in FileZilla by dragging it from the left side (your computer) to the right side (your website).
Step 5 — Sort out your headings

Headings are like chapter titles that search engines read to understand your page. The rule: one main heading (called an H1), then smaller sub-headings under it. Here is how to check yours:

  1. Open the Site Audit and run it on your page's web address.
  2. Scroll to the Headings section of the results. It tells you if you have no H1, more than one H1, or headings in the wrong order — and what it should be instead.
  3. To fix in Notepad++: your main heading should look like <h1>Your main title</h1> and appear only once. Sub-headings use <h2> and <h3>. Make sure there is just one <h1>.
  4. Save (Ctrl+S) and upload with FileZilla.
Step 6 — Add schema markup

Schema is hidden text that tells Google your page is a business, article, product or review — and it can earn you the fancy Google results with stars and extra info. You do not write it yourself; our tool writes it for you:

  1. Open the AI Schema Generator and give it your page's web address.
  2. It reads your page and produces a block of code called JSON-LD. Copy the whole block (there is usually a "copy" button).
  3. In Notepad++, find the line </head> (press Ctrl+F, type </head>, Enter). Click just before it and paste the copied block there.
  4. Save (Ctrl+S) and upload with FileZilla. Do not worry about understanding the code — you only need to paste it in the right spot.
Step 7 — Check your schema works

After adding schema, make sure Google will accept it:

  1. Open the Schema Debugger and run it on the page you just updated.
  2. It scores your markup out of 100 against Google's rules and lists any errors (must fix) and warnings (nice to fix).
  3. If it flags something, go back to the AI Schema Generator, regenerate, paste the new block over the old one in Notepad++, upload again, and re-check until the errors are gone.

A green, error-free score is what makes the rich results (stars, prices, FAQs) possible.

Now check how visible your page is to the AI answer engines:

  1. Open the AEO Checker and run it on your page.
  2. It shows how easily ChatGPT, Perplexity and Google AI Overviews can read and quote your page, and gives you a list of tweaks to get quoted more often.
  3. Work through its suggestions the same way as before: make the change in Notepad++, save, upload with FileZilla, then re-run the checker to confirm the score improved.
Step 10 — Get found locally (Maps and more)

If you serve a local area, this matters both for Google Maps and for AI answers that recommend nearby businesses. Run these three checks in turn:

  1. Open the Maps Audit and follow its checklist for your Google Maps listing.
  2. Open the Google Business Profile Audit — this checks your free Google business listing (your name, address, phone, opening hours, photos and reviews). It tells you exactly what is missing or inconsistent.
  3. Open the Local SEO Checker and run it on your page to confirm your area and contact details are set up so Google links them to your business.

The most common local fix is making your name, address and phone number identical everywhere — on your site, your Google listing and any directories. Even small differences confuse Google.

Step 11 — Readable and trustworthy

Google rewards pages that are easy to read and clearly written by someone who knows their subject (Google calls this E-E-A-T). Two quick checks:

  1. Open the Readability check and run it on your page. It flags long, hard-to-read sentences and suggests simpler wording. Edit the text in Notepad++, save and upload.
  2. Open the E-E-A-T check. It looks for trust signals — an author name, an "about" page, contact details, dates — and tells you which to add. Add the ones it suggests, then re-run.
Step 12 — Make it fast

A slow page loses visitors and rankings. Here is how to find out what is slowing yours down:

  1. Open the Core Web Vitals check and run it on your page.
  2. It measures your speed and points to the cause — most often large images or too much clutter loading at once.
  3. If images are the problem, the usual fix is to shrink them before uploading: a photo straight from a phone is far bigger than a web page needs. A free tool like tinypng.com will shrink them. Replace the big image with the smaller one in FileZilla, then re-run the check.
Step 13 — Your page now shines

That is the full set. You now have a proper title and description, clean headings, working schema, an llms.txt file, AI visibility, strong local signals, readable trusted content and good speed — a page Google and the AI engines actually notice.

  1. Run the full Site Audit one more time to confirm everything is green.
  2. Come back and re-run it any time you change the page, so it stays sharp.
  3. Repeat these steps for your other important pages, one at a time.
Frequently asked questions

What is the difference between SEO, AEO and Schema?

SEO helps Google rank your page, AEO helps AI engines quote your page, and Schema is structured data that tells both what your page is.

Do I need to know how to code?

No. The guide uses free tools and the audit tools generate the schema, llms.txt and fixes for you to copy and paste.

What is an llms.txt file?

A simple text file in your site root that tells AI search engines what your site is about and which pages matter.

How much does it cost?

Pay-as-you-go with no subscription. Most checks cost between 1p and £3.99 per run, and credits never expire.

What is llms.txt and how do I get noticed by AI?

AI crawlers like ChatGPT, Claude and Perplexity read an llms.txt file before deciding whether to cite your site. Most sites do not have one. Our LLMs.txt Generator creates a full set of AI discovery files in one go — llms.txt, llms-full.txt, llms.md, plus the emerging ai.txt, identity.json, agents.md and ai-catalog.json. Enter your site details, hit Generate, upload to your site root — done in under a minute. Follow the steps below to check what you are missing, generate your files, and get your site cited by AI.

How is your website built? Pick yours to see the right instructions throughout the steps:

You edit HTML files directly in Notepad++ and upload them via FileZilla. The steps below use this method by default.
In WordPress, most changes are made via Appearance → Theme Editor (for header/footer code) or a plugin like Yoast SEO or Rank Math for titles, descriptions and schema. The steps below will note the WordPress equivalent for each action.
In Wix, edit page titles and descriptions via Pages → Page SEO. Add code (schema, llms.txt headers) via Settings → Custom Code. Wix handles most technical basics automatically but has limited control over advanced schema and server files like llms.txt — you may need a Wix Developer account for those.
In Squarespace, edit page titles and descriptions via Pages → Page Settings → SEO. Add custom code via Settings → Advanced → Code Injection. Squarespace doesn't allow direct file uploads for llms.txt — use the URL Mapping feature or a custom domain redirect as a workaround.
In Shopify, edit page titles and descriptions via Online Store → Pages → Edit SEO. Add custom code via Online Store → Themes → Edit Code (theme.liquid for header code). For llms.txt, add it to your theme's root or use a Shopify app.
You have hosting with a control panel (cPanel or Plesk). Use the File Manager inside your control panel to upload and edit files directly in your browser — no FTP program needed. Find it under Files → File Manager in cPanel, or Files in Plesk. For editing, use the built-in code editor or download, edit in Notepad++, and re-upload.
If you're not sure, check your hosting provider's documentation for how to upload files and edit page code. The audit tools work the same regardless of platform — the only difference is how you apply the fixes.
Step 1 — First, check if you already have an llms.txt

Before creating anything, check which AI discovery files your site already has. Open a new browser tab and visit yourdomain.com/llms.txt — if you see a blank page or a 404, you do not have one yet. Do the same for llms-full.txt, llms.md, ai.txt, identity.json, agents.md and /.well-known/ai-catalog.json. Make a note of which are missing — you will generate them all in Step 2.

Go to the LLMs.txt Generator →

Step 3 — What are we actually trying to do?

Three simple goals, in plain English:

  1. Get cited by AI. ChatGPT, Claude and Perplexity read llms.txt to understand who you are and what you do — before deciding whether to mention you in answers.
  2. Tell AI what matters most. llms-full.txt lists your key pages with descriptions so AI systems index the right content, not random pages.
  3. Work with every AI agent. llms.md gives agents that prefer markdown a clean, structured version of the same information.
Step 4 — Write your site name and description

Your llms.txt needs a clear, one-sentence description of what your site does. AI systems use this to decide if your site is relevant to a query. Bad example: "Welcome to our website." Good example: "aiwebpageseo.com provides pay-as-you-go SEO, AEO and schema audit tools for small business owners." Keep it factual, specific and under 160 characters.

WordPress: Copy your SEO plugin's site description. Wix/Squarespace: Use your site tagline. All platforms: Paste it into the Description field in the LLMs.txt Generator.

Step 5 — List your most important pages

The llms-full.txt file lists your key pages so AI systems know which URLs matter most. In the LLMs.txt Generator, add each important page — your homepage, main service pages, blog, pricing — with a short description of what each one covers. Aim for 5-15 pages. You do not need to list every URL, just the ones you want AI to recommend to users.

Step 6 — Generate your AI discovery files

Go to the LLMs.txt Generator. Fill in your site name, description, key pages and any usage permissions (whether AI can train on your content, cite it, or both). Hit Generate. The tool produces the full set simultaneously: llms.txt (short summary), llms-full.txt (full page list with descriptions), llms.md (markdown format), plus the emerging AI discovery files ai.txt, identity.json, agents.md and ai-catalog.json. Download them all.

WordPress: No plugin needed — you upload the files directly. cPanel/Plesk: Use File Manager. Wix: Use the Media Manager or a custom route via Velo.

Step 7 — Upload the files to your site root

Most files go in the root of your domain — not a subfolder: yourdomain.com/llms.txt, llms-full.txt, llms.md, ai.txt, identity.json and agents.md. The one exception is ai-catalog.json, which goes in the /.well-known/ folder (yourdomain.com/.well-known/ai-catalog.json). Upload them the same way you would upload any file.

FileZilla: Connect to your server, navigate to the public root folder (often public_html or httpdocs), drag and drop the files in (create a .well-known folder for the catalog). cPanel/Plesk File Manager: Navigate to public root, click Upload, select the files. WordPress: Use a File Manager plugin or FTP to upload to the WordPress root (same folder as wp-config.php).

Step 8 — Verify the files are live

After uploading, open each URL in a browser to confirm they are accessible. Visit yourdomain.com/llms.txt — you should see the plain text content of your file. Do the same for llms-full.txt and llms.md. If you see a 404 error, the file is in the wrong folder. If you see a download prompt instead of the text, your server needs a MIME type added for .txt files (rare — contact your host if this happens).

Step 9 — Allow AI crawlers in robots.txt

Your robots.txt file controls which automated visitors can read your site. Some robots.txt rules accidentally block AI crawlers. Open yourdomain.com/robots.txt and check for any Disallow rules that might block GPTBot, ClaudeBot, PerplexityBot or Google-Extended. If they are blocked, add explicit Allow: / rules for each. Use the Robots & Sitemap Tester to check your current setup and see exactly what AI crawlers are and are not allowed to access.

Step 10 — Add your llms.txt to your sitemap

Adding a reference to your llms.txt in your sitemap.xml helps AI crawlers and search engines discover it faster. In your sitemap, add a URL entry for yourdomain.com/llms.txt. WordPress with Yoast/Rank Math: Add the URL as a custom page in the sitemap settings. Manual sitemap: Add a <url><loc>https://yourdomain.com/llms.txt</loc></url> entry. Then submit your sitemap to Google Search Console to trigger a fresh crawl.

Step 11 — Set your AI usage permissions

Your llms.txt can explicitly state what AI systems are and are not allowed to do with your content. The three main permissions are: ai-train (can AI companies use your content to train their models?), search (can AI-powered search tools cite your content in answers?), and ai-input (can your content be used as input when a user asks an AI a question?). The LLMs.txt Generator includes a permissions section — set these according to your preferences before generating. Example: ai-train=no, search=yes, ai-input=yes allows citation but blocks training data use.

Step 12 — Keep your llms files up to date

Your llms.txt files should reflect your current site. Every time you add a major new page, change your business description, or update your key services, regenerate the files and re-upload them. AI crawlers re-read llms.txt periodically — an outdated file means AI systems describe your business incorrectly to users. Set a reminder to review your files every 1-3 months, or whenever your site changes significantly.

Step 13 — Test how AI engines see you now

After uploading your llms files and allowing AI crawlers, test how AI systems now describe your site. Ask ChatGPT, Claude or Perplexity: "What does [yourdomain.com] do?" or "Tell me about [your business name]." Compare the answer to what you put in your llms.txt description. If the answer is inaccurate or vague, refine your description and regenerate. Use the AI Visibility Checker to track whether your site is being cited in AI answers over time.

Frequently asked questions about llms.txt

What exactly does an llms.txt file do?

It is a plain-text file at your site root that tells AI crawlers which pages matter and how to read your site, so engines like ChatGPT, Claude and Perplexity can find and cite your best content directly.

How is llms.txt different from robots.txt?

robots.txt controls which bots may access which paths. llms.txt guides AI engines to the content worth citing and summarises what each page covers. You want both — robots.txt to let the AI bots in, llms.txt to steer them once they are there.

Do I still need llms.txt if I already have a sitemap?

Yes. A sitemap is an exhaustive crawl list for search engines. llms.txt is a curated, human-readable shortlist of your highest-value pages with short descriptions, which AI engines use to decide what to surface.

How do I deploy llms.txt on my site?

Generate the file, upload it to your domain root so it loads at yourdomain.com/llms.txt, confirm it opens in a browser, then reference it from robots.txt. The platform picker above shows the exact steps for your setup.

How do I run a full site audit with Site Audit Pro?

Site Audit Pro is the most thorough check on the platform — it runs 28 parallel checks and streams the results in as each finishes, combining on-page SEO, accessibility, schema, Lighthouse performance, backlinks, ranked keywords, brand SERP and sentiment into one report. You can optionally audit a competitor side-by-side and add your brand and social handles. Follow the steps below to run it and fix what it finds, whatever your site is built on. Run it from the Site Audit Pro tool.

How is your website built? Pick yours to see the right instructions throughout the steps:

You edit HTML files directly in Notepad++ and upload them via FileZilla. The steps below use this method by default.
In WordPress, most changes are made via Appearance → Theme Editor (for header/footer code) or a plugin like Yoast SEO or Rank Math for titles, descriptions and schema. The steps below will note the WordPress equivalent for each action.
In Wix, edit page titles and descriptions via Pages → Page SEO. Add code via Settings → Custom Code. Wix handles most technical basics automatically but has limited control over advanced schema and server files — you may need a Wix Developer account for those.
In Squarespace, edit page titles and descriptions via Pages → Page Settings → SEO. Add custom code via Settings → Advanced → Code Injection. Squarespace doesn't allow direct file uploads — use the URL Mapping feature or a custom domain redirect as a workaround.
In Shopify, edit page titles and descriptions via Online Store → Pages → Edit SEO. Add custom code via Online Store → Themes → Edit Code (theme.liquid for header code).
You have hosting with a control panel (cPanel or Plesk). Use the File Manager inside your control panel to upload and edit files directly in your browser — no FTP program needed. Find it under Files → File Manager in cPanel, or Files in Plesk. For editing, use the built-in code editor or download, edit in Notepad++, and re-upload.
If you're not sure, check your hosting provider's documentation for how to upload files and edit page code. The audit tools work the same regardless of platform — the only difference is how you apply the fixes.
Step 1 — First, run the audit

Before changing anything, run Site Audit Pro so you know exactly what to fix. It runs 28 checks at once and streams results in as each section finishes.

  1. Open the Site Audit Pro tool.
  2. Paste your full page web address into the Audit URL box.
  3. Choose your Country (sets the Google location checked against) and Language.
  4. Click Start Audit; results stream in over 30–60 seconds. Let it finish before acting.

Open Site Audit Pro now →

Step 2 — What we are trying to do

In plain English: find every issue holding your page back — across SEO, speed, accessibility and trust — in one pass, so you fix the high-impact ones first. The report covers on-page SEO, schema, accessibility, Lighthouse performance, backlinks, ranked keywords, brand SERP and sentiment, all in one place.

Step 3 — If the audit will not run

If you see “Could not fetch page” or a timeout, your site or its security is blocking our server. Our audits fetch your page from our server IP 87.106.96.71 like a normal browser, and some firewalls block datacentre IPs.

  1. FileZilla / cPanel / Plesk: ask your host to allowlist 87.106.96.71 on ports 80 and 443.
  2. WordPress with Wordfence or a security plugin: add 87.106.96.71 to its allowlist.
  3. Cloudflare: Security → WAF → Tools → IP Access Rules → add 87.106.96.71 as Allow.
  4. Wix / Squarespace / Shopify: rarely block us — if it fails, check the URL is public and not password-protected.
  5. Re-run a few minutes after the change.
Step 4 — Read your results top-down

Findings are ordered by impact. Start at the top — those move the needle most. Each item has a plain-English explanation and an effort label. Keep the report open; the steps below map to its sections.

Step 5 — Fix your title and description

Your title is the blue headline Google shows; your description is the grey summary underneath.

  1. Open the Meta Analyzer, paste your URL, copy the suggested title and description.
  2. FileZilla / cPanel / Plesk: in Notepad++ replace the text between <title></title> and the content="…" of the meta description; save and upload.
  3. WordPress: edit them in your Yoast/Rank Math snippet box. Wix: Pages → Page SEO. Squarespace: Page Settings → SEO. Shopify: Online Store → Pages → Edit SEO.
Step 6 — Sort out your headings

Use one main heading (H1), then ordered sub-headings.

  1. FileZilla / cPanel / Plesk: in Notepad++ make your main heading <h1>…</h1> (once) and sub-headings <h2>/<h3>; upload.
  2. WordPress: set the heading block to Heading 1; sub-headings to H2/H3.
  3. Wix / Squarespace: choose Heading 1 / Heading 2 from the text style menu. Shopify: set levels in the editor.
Step 7 — Fix schema flags

The schema section flags missing or broken structured data. The generator writes it for you.

  1. Open the AI Schema Generator, give it your URL, copy the JSON-LD block.
  2. FileZilla / cPanel / Plesk: paste before </head> in Notepad++; upload.
  3. WordPress: header-code plugin or Yoast/Rank Math schema. Wix: Settings → Custom Code. Squarespace: Code Injection. Shopify: theme.liquid.
  4. Validate with the Schema Debugger until error-free.
Step 8 — Clear accessibility issues

The Lighthouse section flags missing alt text, low contrast, or unlabelled buttons.

  1. FileZilla / cPanel / Plesk: add alt="…" and button labels in Notepad++; fix contrast in CSS; upload.
  2. WordPress: add alt text in the Media Library/image block; adjust colours in the Customizer.
  3. Wix / Squarespace: add alt text in image settings; adjust colours in the design panel. Shopify: set alt text and contrast in theme settings.
Step 9 — Speed it up

The performance section shows what is slowing the page — usually large images.

  1. Shrink large images with tinypng.com before they go live.
  2. FileZilla / cPanel / Plesk: replace the file via FileZilla or File Manager.
  3. WordPress: swap in the Media Library. Wix / Squarespace / Shopify: re-upload in the media manager.
  4. Re-run to confirm the speed score improved.
Step 10 — Review backlinks and ranked keywords

Site Audit Pro pulls the backlinks pointing at your page and the keywords you already rank for.

  1. Scan backlinks for low-quality domains to disavow later.
  2. Use ranked keywords as quick wins to strengthen on the page.
  3. For deeper work, use the Backlink Tools.
Step 11 — Check your brand SERP and sentiment

This shows what people see when they Google your business name, and the tone of your content.

  1. Open the “Add brand & social presence checks” panel before running and enter your handles (just the handle, e.g. aipageseo).
  2. Make sure your own profiles dominate your brand search; fix anything inaccurate.
Step 12 — Run the optional competitor comparison

Audit a rival side-by-side to see where they beat you.

  1. Open the “Compare with another site” panel before running and enter a competitor URL.
  2. Read the side-by-side; copy what works on schema, speed and headings.
Step 13 — Re-run, confirm green, and export

After fixes, re-run and keep a record.

  1. Re-run Site Audit Pro on the same URL.
  2. Confirm the issues you fixed now pass.
  3. Export the PDF/CSV, then repeat for your other important pages, one at a time.
Frequently asked questions

How is this different from the standard Site Audit?

Site Audit Pro runs 28 parallel checks and adds backlinks, ranked keywords, brand SERP and sentiment on top of the standard on-page checks.

Why does it say it cannot fetch my page?

Your firewall or security plugin is likely blocking our server IP. Allowlist 87.106.96.71 on ports 80 and 443 (Step 3) and re-run.

How much does it cost?

Pay-as-you-go with no subscription. Credits never expire.

How do I find my local ranking dead zones with Geo-Grid?

Geo-Grid shows how your Google rankings change from one spot to the next. It runs the same search from a 5×5 grid (25 points) around your business and plots a heatmap, so you can see where you rank and where you vanish. Follow the steps below to run it and fix the weak spots, on any platform. Run it from the Geo-Grid tool.

How is your website built? Pick yours to see the right instructions throughout the steps:

You edit HTML files directly in Notepad++ and upload them via FileZilla. The steps below use this method by default.
In WordPress, most changes are made via Appearance → Theme Editor (for header/footer code) or a plugin like Yoast SEO or Rank Math for titles, descriptions and schema. The steps below will note the WordPress equivalent for each action.
In Wix, edit page titles and descriptions via Pages → Page SEO. Add code via Settings → Custom Code. Wix handles most technical basics automatically but has limited control over advanced schema and server files — you may need a Wix Developer account for those.
In Squarespace, edit page titles and descriptions via Pages → Page Settings → SEO. Add custom code via Settings → Advanced → Code Injection. Squarespace doesn't allow direct file uploads — use the URL Mapping feature or a custom domain redirect as a workaround.
In Shopify, edit page titles and descriptions via Online Store → Pages → Edit SEO. Add custom code via Online Store → Themes → Edit Code (theme.liquid for header code).
You have hosting with a control panel (cPanel or Plesk). Use the File Manager inside your control panel to upload and edit files directly in your browser — no FTP program needed. Find it under Files → File Manager in cPanel, or Files in Plesk. For editing, use the built-in code editor or download, edit in Notepad++, and re-upload.
If you're not sure, check your hosting provider's documentation for how to upload files and edit page code. The audit tools work the same regardless of platform — the only difference is how you apply the fixes.
Step 1 — First, run the grid scan

Run it first to get your baseline heatmap.

  1. Open the Geo-Grid tool.
  2. Enter your website URL, the keyword to track (e.g. emergency plumber Sheffield), and your centre address, then click Find location.
  3. Choose grid size (3×3 = 9, 5×5 = 25, 7×7 = 49) and radius (1 km city centre, 3 km small town, 5 km default, 10 km wider).
  4. Optionally tick Email me when complete — ~25 searches, about 3 minutes. Click Run audit.

Open Geo-Grid now →

Step 2 — What we are trying to do

See your true local reach, not a single-point ranking. Google biases local results toward whoever is physically closest, so you can rank first next door and vanish a mile away. Green points = you rank; red = dead zones where competitors win.

Step 3 — Read the heatmap
  1. Green — you rank well there. Red — a dead zone.
  2. Look at the pattern: fading at the edges means your local signals do not travel far.
  3. Download the CSV to keep the baseline.
Step 4 — Fix #1: NAP consistency

Name, Address and Phone must be identical everywhere — even “St” vs “Street” counts. Use phone in E.164 (e.g. +441142000000).

  1. FileZilla / cPanel / Plesk: in Notepad++ make the footer/contact NAP match your Google listing exactly; upload.
  2. WordPress: edit in theme footer/widget or contact block.
  3. Wix / Squarespace: edit the footer/contact element. Shopify: theme footer settings.
  4. Confirm the same NAP on your Google Business Profile and directories.
Step 5 — Fix #2: complete your Google Business Profile

Your GBP is the primary Maps signal.

  1. Run the GBP Audit to find gaps.
  2. In business.google.com, fill categories, hours, photos, services, attributes.
  3. This is done in Google, not on your website — platform-independent.
Step 6 — Fix #3: add LocalBusiness schema with geo coordinates
  1. Get coordinates: in maps.google.com, right-click your premises and click the lat/lng (e.g. 53.3811, -1.4701) to copy.
  2. Generate markup with the AI Schema Generator including geo, openingHoursSpecification and your GBP sameAs link.
  3. FileZilla / cPanel / Plesk: paste before </head> in Notepad++. WordPress: header plugin or Yoast/Rank Math local schema. Wix: Custom Code. Squarespace: Code Injection. Shopify: theme.liquid.
  4. Validate with the Schema Debugger.
Step 7 — Fix #4: add your GBP link and a Maps embed
  1. Find your GBP link: search your business in Google, open the Knowledge Panel → View on Google Maps, copy the URL (or the short g.page / maps.app.goo.gl link).
  2. Add it to your schema sameAs array and as a visible “Find us on Google Maps” footer link.
  3. Embed a Maps iframe on your contact page — Notepad++ (FileZilla/cPanel), an embed block (WordPress/Wix/Squarespace), or theme editor (Shopify).
Step 8 — Fix #5: build local reviews
  1. Ask recent customers for a Google review (share your g.page link).
  2. Respond to every review — Google rewards active profiles.
  3. Add aggregateRating to your schema for stars in results.
Step 9 — Fix #6: local content and area pages
  1. Create a page for each area you serve, with genuine local content (not duplicated).
  2. FileZilla / cPanel / Plesk: build in Notepad++ and upload. WordPress: add a Page. Wix / Squarespace / Shopify: add a page in the editor.
  3. Link these from your nav or footer so Google finds them.
Step 10 — Re-run the grid and track the change

Run Geo-Grid again on the same keyword and centre. Watch red turn green against your CSV baseline. Local changes take time — allow a few weeks between runs.

Step 11 — Compare against a competitor

Check who beats you in the red zones — their GBP completeness, review count and categories with the GBP Audit — and close the gaps.

Step 12 — Keep monitoring

Local rankings shift. Save your location in the tool and re-run monthly; tick the email option so the report comes to you.

Frequently asked questions

Why do my rankings change by location?

Google personalises local results by the searcher's position. The grid runs the same search from many points so you see the full spread.

How many points does it check?

3×3 (9), 5×5 (25, default) or 7×7 (49). More points are more accurate but cost more.

How long and what does it cost?

A 5×5 grid runs ~25 searches in about 3 minutes. PAYG, credits never expire.

How do I rank in the Google Maps 3-pack?

The Local SEO Checker audits the 24 signals Google uses to rank businesses in the Maps 3-pack — LocalBusiness schema completeness, NAP consistency, opening hours, geo coordinates and Google Business Profile signals. Follow the steps below to run it and fix each signal, on any platform. Run it from the Local SEO Checker.

How is your website built? Pick yours to see the right instructions throughout the steps:

You edit HTML files directly in Notepad++ and upload them via FileZilla. The steps below use this method by default.
In WordPress, most changes are made via Appearance → Theme Editor (for header/footer code) or a plugin like Yoast SEO or Rank Math for titles, descriptions and schema. The steps below will note the WordPress equivalent for each action.
In Wix, edit page titles and descriptions via Pages → Page SEO. Add code via Settings → Custom Code. Wix handles most technical basics automatically but has limited control over advanced schema and server files — you may need a Wix Developer account for those.
In Squarespace, edit page titles and descriptions via Pages → Page Settings → SEO. Add custom code via Settings → Advanced → Code Injection. Squarespace doesn't allow direct file uploads — use the URL Mapping feature or a custom domain redirect as a workaround.
In Shopify, edit page titles and descriptions via Online Store → Pages → Edit SEO. Add custom code via Online Store → Themes → Edit Code (theme.liquid for header code).
You have hosting with a control panel (cPanel or Plesk). Use the File Manager inside your control panel to upload and edit files directly in your browser — no FTP program needed. Find it under Files → File Manager in cPanel, or Files in Plesk. For editing, use the built-in code editor or download, edit in Notepad++, and re-upload.
If you're not sure, check your hosting provider's documentation for how to upload files and edit page code. The audit tools work the same regardless of platform — the only difference is how you apply the fixes.
Step 1 — First, run the checker
  1. Open the Local SEO Checker, enter your business homepage or location-page URL.
  2. Choose your country (or leave on Auto-detect to read it from your schema) and click Check Local SEO.
  3. It checks 24 signals across schema completeness, on-page NAP visibility and Maps signals.

Open the Local SEO Checker →

Step 2 — What we are trying to do

The Maps 3-pack is the block of three local businesses Google shows at the top for local searches — the single most valuable local position. The five factors are your Google Business Profile, LocalBusiness schema, NAP consistency, reviews and proximity. The first four you can fix; this guide walks them.

Step 3 — Add LocalBusiness JSON-LD schema

The highest-impact fix — without it Google cannot reliably display you in Maps.

  1. Generate it with the Schema Builder, including name, full address, telephone, opening hours, geo coordinates and priceRange.
  2. FileZilla / cPanel / Plesk: paste before </head> in Notepad++. WordPress: Yoast/Rank Math local schema or a header plugin. Wix: Custom Code. Squarespace: Code Injection. Shopify: theme.liquid.
Step 4 — Add your phone in E.164 format

Use the international format, e.g. +441142000000 — required for NAP matching across directories. Add it to your schema telephone field and make sure the same number is visible on the page.

Step 5 — Add geo coordinates
  1. In maps.google.com, right-click your premises (not the road outside) and click the lat/lng shown to copy.
  2. Paste into your schema geo property (latitude & longitude). Precision matters for Maps proximity scoring.
Step 6 — Add opening hours

Use openingHoursSpecification in your schema with dayOfWeek, opens and closes for each block. Make sure these match your Google Business Profile hours exactly.

Step 7 — Add your GBP sameAs link
  1. Find your Google Business Profile URL: search your business in Google → View on Google Maps → copy the URL (or the short g.page / maps.app.goo.gl link).
  2. Add it to the sameAs array in your LocalBusiness schema, and as a visible footer link.
Step 8 — Embed a Google Maps iframe

A direct on-page local signal. Add a Maps embed to your contact page: FileZilla / cPanel / Plesk paste the iframe in Notepad++; WordPress / Wix / Squarespace use an HTML/embed block; Shopify add it in the theme editor.

Step 9 — Add aggregateRating for stars

Include ratingValue and reviewCount in your schema to unlock star ratings in search results. Keep these honest and in step with your real Google reviews.

Step 10 — Make NAP identical everywhere

Name, Address and Phone must be character-for-character identical across your schema, your visible page, your Google Business Profile and every directory (Yell, Yelp, Facebook). Even “St” vs “Street” is a mismatch. Fix any the checker flags.

Step 11 — Re-run and confirm

Run the checker again. Schema must be present before the NAP cross-checks are meaningful, so re-run after adding schema, then work down the remaining flags. Aim to clear all 24 signals.

Frequently asked questions

What is the Maps 3-pack?

The three local listings Google shows at the top of local searches, above the normal results. It drives most local clicks.

How is this different from Geo-Grid?

The Local SEO Checker audits your page's signals; Geo-Grid shows how your live ranking varies by location.

What does it cost?

Pay-as-you-go, no subscription, credits never expire.

How do I make my site discoverable by AI agents?

AI agents, crawlers and automated tools need specific signals to discover, understand and interact with your site. The AI Agent Readiness Audit checks 16 signals across discovery files, content access, security headers and crawler permissions, in about 5 seconds. Follow the steps below to run it and add what you are missing. Run it from the AI Agent Readiness Audit.

How is your website built? Pick yours to see the right instructions throughout the steps:

You edit HTML files directly in Notepad++ and upload them via FileZilla. The steps below use this method by default.
In WordPress, most changes are made via Appearance → Theme Editor (for header/footer code) or a plugin like Yoast SEO or Rank Math for titles, descriptions and schema. The steps below will note the WordPress equivalent for each action.
In Wix, edit page titles and descriptions via Pages → Page SEO. Add code via Settings → Custom Code. Wix handles most technical basics automatically but has limited control over advanced schema and server files — you may need a Wix Developer account for those.
In Squarespace, edit page titles and descriptions via Pages → Page Settings → SEO. Add custom code via Settings → Advanced → Code Injection. Squarespace doesn't allow direct file uploads — use the URL Mapping feature or a custom domain redirect as a workaround.
In Shopify, edit page titles and descriptions via Online Store → Pages → Edit SEO. Add custom code via Online Store → Themes → Edit Code (theme.liquid for header code).
You have hosting with a control panel (cPanel or Plesk). Use the File Manager inside your control panel to upload and edit files directly in your browser — no FTP program needed. Find it under Files → File Manager in cPanel, or Files in Plesk. For editing, use the built-in code editor or download, edit in Notepad++, and re-upload.
If you're not sure, check your hosting provider's documentation for how to upload files and edit page code. The audit tools work the same regardless of platform — the only difference is how you apply the fixes.
Step 1 — First, run the audit
  1. Open the AI Agent Readiness Audit and enter your domain.
  2. Click Run audit. It returns a score out of 100 across four groups in about 5 seconds: Discovery Files, Content Access, Security & Headers, and AI Crawler Access.

Open the Agent Readiness Audit →

Step 2 — What we are trying to do

Search engines are increasingly replaced by AI agents. Sites that publish discovery files — llms.txt, API catalogs, agent cards — get cited more and integrated into AI workflows. Sites that do not are invisible to the next generation of web infrastructure. The goal is to pass all 16 signals.

Step 3 — Add an llms.txt file

The most important discovery file. Generate it with the LLMs.txt Generator, then upload to your site root.

  1. FileZilla / cPanel / Plesk: upload llms.txt to your public root (httpdocs/public_html) so it loads at yourdomain.com/llms.txt.
  2. WordPress: upload to the WordPress root via FTP or a File Manager plugin. Wix: Media Manager or a Velo route. Squarespace: URL mapping/redirect workaround. Shopify: theme root or an app.
Step 4 — Add an API catalog and agent cards

The audit checks for an API catalog, an MCP server card and an A2A agent card. These are small JSON/text files that tell agents what your site offers.

  1. Create the files the audit lists as missing and upload them to your site (and /.well-known/ where required), the same way you uploaded llms.txt.
  2. These are server files — on Wix/Squarespace you may need the platform's custom-file or developer features.
Step 5 — Confirm content access and markdown

Agents often prefer a clean markdown version of a page. The audit checks whether your server can serve it and whether your content is reachable. If markdown negotiation fails, your host or platform may need a small configuration change — ask your host (cPanel/Plesk) or check platform docs (Wix/Squarespace/Shopify).

Step 6 — Check your security headers

The Security & Headers group looks for appropriate response headers. Add any the audit flags — cPanel/Plesk via server config or .htaccess; WordPress via a headers plugin; hosted platforms apply sensible defaults but expose fewer controls.

Step 7 — Allow AI crawlers in robots.txt

The AI Crawler Access group checks your robots.txt does not block agents. Open yourdomain.com/robots.txt and make sure GPTBot, ClaudeBot, PerplexityBot and Google-Extended are not disallowed. Use the Robots & Sitemap Tester to confirm.

Step 8 — Re-run until all pass

After adding the files and fixes, re-run the audit until every signal passes. This puts you ahead of the vast majority of sites, which expose none of these yet.

Frequently asked questions

What is an AI agent?

Software that browses and acts on the web for a user — booking, comparing, summarising. They read machine-readable signals your site can provide.

Is this the same as llms.txt?

llms.txt is one of the 16 signals. Agent readiness is broader — it also covers agent cards, MCP server cards, API catalogs, headers and crawler access.

What does it cost?

Pay-as-you-go, no subscription, credits never expire.

How do I get cited in Google AI Overviews?

The AI Visibility Tracker monitors whether your domain is cited in Google AI Overviews and AI Mode for your most important queries, and shows your citation share over time versus competitors. AI Overviews now appear on a large share of searches and cite only a handful of sources — if you are not in them, you are invisible even at position 1. Follow the steps below. Set it up from the AI Visibility Tracker.

How is your website built? Pick yours to see the right instructions throughout the steps:

You edit HTML files directly in Notepad++ and upload them via FileZilla. The steps below use this method by default.
In WordPress, most changes are made via Appearance → Theme Editor (for header/footer code) or a plugin like Yoast SEO or Rank Math for titles, descriptions and schema. The steps below will note the WordPress equivalent for each action.
In Wix, edit page titles and descriptions via Pages → Page SEO. Add code via Settings → Custom Code. Wix handles most technical basics automatically but has limited control over advanced schema and server files — you may need a Wix Developer account for those.
In Squarespace, edit page titles and descriptions via Pages → Page Settings → SEO. Add custom code via Settings → Advanced → Code Injection. Squarespace doesn't allow direct file uploads — use the URL Mapping feature or a custom domain redirect as a workaround.
In Shopify, edit page titles and descriptions via Online Store → Pages → Edit SEO. Add custom code via Online Store → Themes → Edit Code (theme.liquid for header code).
You have hosting with a control panel (cPanel or Plesk). Use the File Manager inside your control panel to upload and edit files directly in your browser — no FTP program needed. Find it under Files → File Manager in cPanel, or Files in Plesk. For editing, use the built-in code editor or download, edit in Notepad++, and re-upload.
If you're not sure, check your hosting provider's documentation for how to upload files and edit page code. The audit tools work the same regardless of platform — the only difference is how you apply the fixes.
Step 1 — Set up tracking
  1. Open the AI Visibility Tracker and enter your domain.
  2. Add up to five competitors and your queries to track (one per line) — the questions your customers actually ask.
  3. Choose your location and a bundle (one-shot, daily for a week, or weekly/monthly over a quarter), then click Run audit.

Open the AI Visibility Tracker →

Step 2 — What we are trying to do

See exactly which of your queries cite you, which cite competitors, and which nobody owns — the number most SEOs do not track. The aim is to grow your citation share in AI answers over time.

Step 3 — Read your first results

For each query, the tracker shows whether your domain is cited in the AI Overview, who else is cited, and your share. Note the queries where you are absent — those are your targets.

Step 4 — Fix a page that is not cited

For each missing query, strengthen the page that should answer it.

  1. Run the AEO Checker on that page to see what is holding it back.
  2. Add clear, direct question-answering content near the top of the page.
  3. Add FAQPage schema with the AI Schema Generator: FileZilla/cPanel/Plesk paste before </head>; WordPress schema plugin; Wix Custom Code; Squarespace Code Injection; Shopify theme.liquid.
Step 5 — Make sure AI can read the page

Confirm AI bots are not blocked in robots.txt and that the page has an entry in your llms.txt. AI cannot cite a page it cannot read or does not know matters.

Step 6 — Track the trend, not the week

Choose a weekly or monthly bundle so the tracker records a history. Watch citations grow as your AEO work takes effect — steady improvement means your content is becoming the answer AI reaches for. Re-check competitors to see where they still win.

Frequently asked questions

What are AI Overviews?

The AI-generated summaries Google shows at the top of many searches, citing a few sources. Being cited drives visibility even without a classic ranking.

How fast is a run?

Each query takes 1–2 seconds; a 25-query audit runs in about 40–50 seconds.

Do I need a subscription?

No — bundles are pay-as-you-go and end when the runs are used up.

How do I check my website's trust and credibility signals?

The Website Trust Audit runs a passive scan of any public site and grades it 0–100 on the signals that affect how trustworthy it looks to search engines, AI and visitors — domain age and WHOIS, Google Safe Browsing, backlink spam and authority, on-page identity (contact details, schema, About/Contact/Privacy/Terms), robots.txt behaviour, technology stack and TLD risk. It runs in 15–20 seconds with no active payloads. Run it from the Website Trust Audit.

How is your website built? Pick yours to see the right instructions throughout the steps:

You edit HTML files directly in Notepad++ and upload them via FileZilla. The steps below use this method by default.
In WordPress, most changes are made via Appearance → Theme Editor (for header/footer code) or a plugin like Yoast SEO or Rank Math for titles, descriptions and schema. The steps below will note the WordPress equivalent for each action.
In Wix, edit page titles and descriptions via Pages → Page SEO. Add code via Settings → Custom Code. Wix handles most technical basics automatically but has limited control over advanced schema and server files — you may need a Wix Developer account for those.
In Squarespace, edit page titles and descriptions via Pages → Page Settings → SEO. Add custom code via Settings → Advanced → Code Injection. Squarespace doesn't allow direct file uploads — use the URL Mapping feature or a custom domain redirect as a workaround.
In Shopify, edit page titles and descriptions via Online Store → Pages → Edit SEO. Add custom code via Online Store → Themes → Edit Code (theme.liquid for header code).
You have hosting with a control panel (cPanel or Plesk). Use the File Manager inside your control panel to upload and edit files directly in your browser — no FTP program needed. Find it under Files → File Manager in cPanel, or Files in Plesk. For editing, use the built-in code editor or download, edit in Notepad++, and re-upload.
If you're not sure, check your hosting provider's documentation for how to upload files and edit page code. The audit tools work the same regardless of platform — the only difference is how you apply the fixes.
Step 1 — First, run the scan
  1. Open the Website Trust Audit, enter any public URL and click Run audit.
  2. It completes in 15–20 seconds using only normal browser requests plus public WHOIS and DNS lookups — no port scans, nothing intrusive.

Open the Website Trust Audit →

Step 2 — What we are trying to do

Grade how credible your site looks and find the weak signals. The score combines domain reputation, authority, on-page identity and behaviour. Work down the issues, which are sorted by impact.

Step 3 — Add clear identity signals

Trust starts with proving who you are.

  1. Make sure a contact email, phone and social profiles are visible on the page.
  2. FileZilla / cPanel / Plesk: add them to your footer/contact section in Notepad++. WordPress: contact block/widget. Wix / Squarespace / Shopify: footer/contact element.
Step 4 — Add the trust pages Google expects

The audit checks for About, Contact, Privacy and Terms pages. Add any that are missing — create a new page on your platform and link it in the footer.

Step 5 — Add Organization schema

Generate Organization JSON-LD with the AI Schema Generator (name, logo, contact, sameAs) and add it before </head> the same way as any schema — Notepad++ (FileZilla/cPanel), header plugin (WordPress), Custom Code (Wix), Code Injection (Squarespace), theme.liquid (Shopify).

Step 6 — Fix robots.txt and reputation flags
  1. Check your robots.txt behaves sensibly and does not block crawlers it should not.
  2. If Safe Browsing or spam score is poor, find the cause — compromised pages, spammy backlinks, or a risky TLD — and resolve it.
  3. Re-scan to confirm the score has improved.
Step 7 — Strengthen authority over time

Domain age and authority build slowly. Earn quality backlinks (see the Backlink Tools), keep the site clean and consistent, and re-run the audit periodically to track the trend.

Frequently asked questions

Does this change my site?

No — it is a passive, read-only scan that only inspects what is publicly visible.

Why does domain age matter?

Older, stable domains are generally trusted more. It is one signal among many, not a verdict on its own.

What does it cost?

Pay-as-you-go, no subscription, credits never expire.

How do I find and fix broken pages on my site?

Broken pages quietly damage rankings and waste visitors. The HTTP Error Audit crawls up to 1,000 pages of your site and surfaces every 400 and 500 error so you can fix them before Google finds them. Follow the steps below. Run it from the HTTP Error Audit.

How is your website built? Pick yours to see the right instructions throughout the steps:

You edit HTML files directly in Notepad++ and upload them via FileZilla. The steps below use this method by default.
In WordPress, most changes are made via Appearance → Theme Editor (for header/footer code) or a plugin like Yoast SEO or Rank Math for titles, descriptions and schema. The steps below will note the WordPress equivalent for each action.
In Wix, edit page titles and descriptions via Pages → Page SEO. Add code via Settings → Custom Code. Wix handles most technical basics automatically but has limited control over advanced schema and server files — you may need a Wix Developer account for those.
In Squarespace, edit page titles and descriptions via Pages → Page Settings → SEO. Add custom code via Settings → Advanced → Code Injection. Squarespace doesn't allow direct file uploads — use the URL Mapping feature or a custom domain redirect as a workaround.
In Shopify, edit page titles and descriptions via Online Store → Pages → Edit SEO. Add custom code via Online Store → Themes → Edit Code (theme.liquid for header code).
You have hosting with a control panel (cPanel or Plesk). Use the File Manager inside your control panel to upload and edit files directly in your browser — no FTP program needed. Find it under Files → File Manager in cPanel, or Files in Plesk. For editing, use the built-in code editor or download, edit in Notepad++, and re-upload.
If you're not sure, check your hosting provider's documentation for how to upload files and edit page code. The audit tools work the same regardless of platform — the only difference is how you apply the fixes.
Step 1 — Run the crawl
  1. Open the HTTP Error Audit, enter your homepage URL and choose how many pages to crawl (up to 1,000).
  2. Start the crawl. It follows your internal links and records the HTTP status of every page it finds.

Open the HTTP Error Audit →

Step 2 — What we are trying to do

Find every broken page on your site — the 400-series (client/link problems like 404 Not Found) and 500-series (server failures) — before Google crawls them, because broken pages lose visitors and waste crawl budget.

Step 3 — Fix your 404 and other 400 errors

A 404 means a page or the link to it is broken.

  1. Decide for each: restore the page, fix the link, or redirect the old URL to the right place.
  2. FileZilla / cPanel / Plesk: fix the <a href> in Notepad++, or add a 301 redirect (in .htaccess on Apache, or your host's redirect tool).
  3. WordPress: use a redirect plugin (e.g. Redirection) or fix the link in the editor. Wix / Squarespace / Shopify: add a URL redirect in the platform's redirect/URL settings.
Step 4 — Investigate your 500 errors

500-series errors are server problems — something on the page is failing, and they are more serious than 404s.

  1. Open the page in a browser to confirm it fails.
  2. cPanel / Plesk: check your error logs, or ask your host to investigate. WordPress: a plugin or theme conflict is the usual cause — check recent changes. Wix / Squarespace / Shopify: contact platform support with the URL.
Step 5 — Set up redirects for removed pages

For pages you deliberately deleted, add a 301 redirect to the most relevant live page so visitors and link equity are not lost. Use the Redirect Checker to confirm each redirect resolves cleanly with no chains.

Step 6 — Re-crawl to confirm

After fixing, run the audit again to confirm the errors are gone and no new ones have appeared. Re-run after any big change to the site, since broken links creep in over time as pages move.

Frequently asked questions

What is the difference between 400 and 500 errors?

400-series are client/link problems (e.g. 404 missing page); 500-series are server failures. Both lose visitors and rankings.

How many pages does it crawl?

Up to 1,000 pages in one run.

What does it cost?

Pay-as-you-go, no subscription, credits never expire.

How do I get cited by AI search engines?

The AEO Checker is a technical audit for AI citation readiness. It checks AI bot access, FAQ and HowTo schema, structured-data density and question coverage, and generates ready-to-deploy llms.txt and robots.txt files, with optional competitor comparison. Follow the steps below. Run it from the AEO Checker.

How is your website built? Pick yours to see the right instructions throughout the steps:

You edit HTML files directly in Notepad++ and upload them via FileZilla. The steps below use this method by default.
In WordPress, most changes are made via Appearance → Theme Editor (for header/footer code) or a plugin like Yoast SEO or Rank Math for titles, descriptions and schema. The steps below will note the WordPress equivalent for each action.
In Wix, edit page titles and descriptions via Pages → Page SEO. Add code via Settings → Custom Code. Wix handles most technical basics automatically but has limited control over advanced schema and server files — you may need a Wix Developer account for those.
In Squarespace, edit page titles and descriptions via Pages → Page Settings → SEO. Add custom code via Settings → Advanced → Code Injection. Squarespace doesn't allow direct file uploads — use the URL Mapping feature or a custom domain redirect as a workaround.
In Shopify, edit page titles and descriptions via Online Store → Pages → Edit SEO. Add custom code via Online Store → Themes → Edit Code (theme.liquid for header code).
You have hosting with a control panel (cPanel or Plesk). Use the File Manager inside your control panel to upload and edit files directly in your browser — no FTP program needed. Find it under Files → File Manager in cPanel, or Files in Plesk. For editing, use the built-in code editor or download, edit in Notepad++, and re-upload.
If you're not sure, check your hosting provider's documentation for how to upload files and edit page code. The audit tools work the same regardless of platform — the only difference is how you apply the fixes.
Step 1 — Run the AEO audit
  1. Open the AEO Checker, enter your page URL and run it.
  2. It scores how ready your page is to be quoted by ChatGPT, Perplexity and Google AI Overviews, and lists specific fixes.

Open the AEO Checker →

Step 2 — What we are trying to do

AEO is Answer Engine Optimisation — getting your content quoted by AI answer engines, not just ranked by Google. The biggest single blocker is AI bots being blocked; after that, schema and clear question-answering content do the work.

Step 3 — Confirm AI bots can reach you

The most common reason a site is never cited is AI bots blocked in robots.txt.

  1. The checker confirms whether GPTBot, ClaudeBot, PerplexityBot and Bingbot are allowed and generates a correct robots.txt.
  2. Upload it to your site root: FileZilla / cPanel / Plesk to httpdocs/public_html; WordPress root via FTP/File Manager; Wix / Squarespace / Shopify via the platform's robots settings.
Step 4 — Add the schema it recommends

FAQPage and HowTo schema strongly help AI citation.

  1. Generate them with the AI Schema Generator.
  2. Add before </head>: Notepad++ (FileZilla/cPanel), header plugin (WordPress), Custom Code (Wix), Code Injection (Squarespace), theme.liquid (Shopify).
  3. Validate with the Schema Debugger.
Step 5 — Improve question coverage and density

The checker measures how well your page answers real questions and how much of it is structured. Add clear question-and-answer content near the top, use proper headings, and keep answers direct — AI extracts direct answers first.

Step 6 — Deploy the generated llms.txt

The checker produces a ready llms.txt. Upload it to your site root so AI engines get explicit guidance about your content (same upload method as robots.txt in Step 3). Confirm it loads at yourdomain.com/llms.txt.

Step 7 — Compare against a competitor

Use the optional competitor comparison to see where a rival beats you on AI readiness, and close the gap. Then re-run the checker on your page to confirm your score improved.

Frequently asked questions

What is AEO?

Answer Engine Optimisation — getting your content quoted by AI engines like ChatGPT and Perplexity, not just ranked by Google.

What is the fastest win?

Making sure AI bots are not blocked in robots.txt — the most common reason a site is never cited.

What does it cost?

Pay-as-you-go, no subscription, credits never expire.

How do I improve my E-E-A-T (experience, expertise, authority, trust)?

Google rewards content that shows Experience, Expertise, Authoritativeness and Trust. The E-E-A-T Checker analyses each of these signals with benchmarks so you know what “good” looks like, and effort labels on every fix. Follow the steps below. Run it from the E-E-A-T Checker.

How is your website built? Pick yours to see the right instructions throughout the steps:

You edit HTML files directly in Notepad++ and upload them via FileZilla. The steps below use this method by default.
In WordPress, most changes are made via Appearance → Theme Editor (for header/footer code) or a plugin like Yoast SEO or Rank Math for titles, descriptions and schema. The steps below will note the WordPress equivalent for each action.
In Wix, edit page titles and descriptions via Pages → Page SEO. Add code via Settings → Custom Code. Wix handles most technical basics automatically but has limited control over advanced schema and server files — you may need a Wix Developer account for those.
In Squarespace, edit page titles and descriptions via Pages → Page Settings → SEO. Add custom code via Settings → Advanced → Code Injection. Squarespace doesn't allow direct file uploads — use the URL Mapping feature or a custom domain redirect as a workaround.
In Shopify, edit page titles and descriptions via Online Store → Pages → Edit SEO. Add custom code via Online Store → Themes → Edit Code (theme.liquid for header code).
You have hosting with a control panel (cPanel or Plesk). Use the File Manager inside your control panel to upload and edit files directly in your browser — no FTP program needed. Find it under Files → File Manager in cPanel, or Files in Plesk. For editing, use the built-in code editor or download, edit in Notepad++, and re-upload.
If you're not sure, check your hosting provider's documentation for how to upload files and edit page code. The audit tools work the same regardless of platform — the only difference is how you apply the fixes.
Step 1 — Run the checker
  1. Open the E-E-A-T Checker and enter your page URL.
  2. It scores Experience, Expertise, Authoritativeness and Trust separately, each against a benchmark, with an effort label on every suggested fix.

Open the E-E-A-T Checker →

Step 2 — What we are trying to do

E-E-A-T is the set of qualities Google's guidelines reward, especially for important topics. It is not a single score, but the signals behind it strongly influence how Google and AI assess your content. Tackle the quick wins first using the effort labels.

Step 3 — Strengthen Experience and Expertise

Show real first-hand experience and clear author expertise.

  1. Add an author name, bio and credentials to the page, and genuine first-hand detail in the content.
  2. FileZilla / cPanel / Plesk: add an author byline/box in Notepad++. WordPress: author box plugin or theme setting. Wix / Squarespace / Shopify: add an author element/section in the editor.
Step 4 — Build Authoritativeness

Authority comes from being referenced by others and from clear publisher information.

  1. Add Organization and author schema with the AI Schema Generator (added before </head> the usual per-platform way).
  2. Pursue quality backlinks — see the Backlink Tools.
Step 5 — Raise Trust signals

Trust comes from contact details, policies, HTTPS and accurate content.

  1. Make sure contact details, an About page and clear dates are present.
  2. Add Privacy and Terms pages and link them in the footer. Confirm the site is served over HTTPS.
Step 6 — Re-run and track

After your changes, re-run the checker and watch each of the four scores rise toward its benchmark. Repeat for your other important pages, especially any that give advice or affect decisions.

Frequently asked questions

What does E-E-A-T stand for?

Experience, Expertise, Authoritativeness and Trust — the qualities Google's guidelines reward.

Is E-E-A-T a ranking factor?

Not a single score, but the signals behind it strongly influence how Google and AI assess your content.

What does it cost?

Pay-as-you-go, no subscription, credits never expire.

How do I win the local Google Maps 3-pack?

The Google Maps Audit is a live ranking audit — it shows who ranks in the 3-pack for any keyword, finds your position, analyses competitors and identifies exactly what it takes to reach position 1. Follow the steps below. Run it from the Maps Audit.

How is your website built? Pick yours to see the right instructions throughout the steps:

You edit HTML files directly in Notepad++ and upload them via FileZilla. The steps below use this method by default.
In WordPress, most changes are made via Appearance → Theme Editor (for header/footer code) or a plugin like Yoast SEO or Rank Math for titles, descriptions and schema. The steps below will note the WordPress equivalent for each action.
In Wix, edit page titles and descriptions via Pages → Page SEO. Add code via Settings → Custom Code. Wix handles most technical basics automatically but has limited control over advanced schema and server files — you may need a Wix Developer account for those.
In Squarespace, edit page titles and descriptions via Pages → Page Settings → SEO. Add custom code via Settings → Advanced → Code Injection. Squarespace doesn't allow direct file uploads — use the URL Mapping feature or a custom domain redirect as a workaround.
In Shopify, edit page titles and descriptions via Online Store → Pages → Edit SEO. Add custom code via Online Store → Themes → Edit Code (theme.liquid for header code).
You have hosting with a control panel (cPanel or Plesk). Use the File Manager inside your control panel to upload and edit files directly in your browser — no FTP program needed. Find it under Files → File Manager in cPanel, or Files in Plesk. For editing, use the built-in code editor or download, edit in Notepad++, and re-upload.
If you're not sure, check your hosting provider's documentation for how to upload files and edit page code. The audit tools work the same regardless of platform — the only difference is how you apply the fixes.
Step 1 — Run the audit
  1. Open the Maps Audit, enter the keyword you want to rank for and your location.
  2. It pulls live Google Maps data and shows the current 3-pack and your position.

Open the Maps Audit →

Step 2 — What we are trying to do

Find your live position in the Maps results for a specific keyword, see who holds the top three, and learn exactly what it takes to climb. Unlike the Local SEO Checker (which audits your page's signals), this looks at live ranking and competitors.

Step 3 — Analyse the competitors above you

The audit shows what the businesses ranking above you are doing — reviews, categories, completeness. Note the specific differences; these are your to-do list.

Step 4 — Fix your foundations
  1. Complete your Google Business Profile with the GBP Audit.
  2. Add or correct LocalBusiness schema with geo coordinates (per-platform, before </head>) and make your NAP identical everywhere.
  3. Build steady, answered Google reviews.
Step 5 — Re-run and track your climb

After your fixes, re-run the Maps Audit on the same keyword to track your position over time. Proximity you cannot change, but completeness, schema, NAP and reviews you can — and they move the ranking.

Frequently asked questions

How is this different from the Local SEO Checker?

The Local SEO Checker audits your page's signals; the Maps Audit looks at live ranking and competitors for a specific keyword.

Is the data live?

Yes — it queries real Google Maps results when you run it.

What does it cost?

Pay-as-you-go, no subscription, credits never expire.

How do I complete and optimise my Google Business Profile?

Your Google Business Profile drives your Maps and local visibility. The GBP Audit runs on live Google data — rating, reviews, completeness score, opening hours, photos, categories, popular times, Maps 3-pack position and a competitor gap analysis. Follow the steps below. Run it from the GBP Audit.

How is your website built? Pick yours to see the right instructions throughout the steps:

You edit HTML files directly in Notepad++ and upload them via FileZilla. The steps below use this method by default.
In WordPress, most changes are made via Appearance → Theme Editor (for header/footer code) or a plugin like Yoast SEO or Rank Math for titles, descriptions and schema. The steps below will note the WordPress equivalent for each action.
In Wix, edit page titles and descriptions via Pages → Page SEO. Add code via Settings → Custom Code. Wix handles most technical basics automatically but has limited control over advanced schema and server files — you may need a Wix Developer account for those.
In Squarespace, edit page titles and descriptions via Pages → Page Settings → SEO. Add custom code via Settings → Advanced → Code Injection. Squarespace doesn't allow direct file uploads — use the URL Mapping feature or a custom domain redirect as a workaround.
In Shopify, edit page titles and descriptions via Online Store → Pages → Edit SEO. Add custom code via Online Store → Themes → Edit Code (theme.liquid for header code).
You have hosting with a control panel (cPanel or Plesk). Use the File Manager inside your control panel to upload and edit files directly in your browser — no FTP program needed. Find it under Files → File Manager in cPanel, or Files in Plesk. For editing, use the built-in code editor or download, edit in Notepad++, and re-upload.
If you're not sure, check your hosting provider's documentation for how to upload files and edit page code. The audit tools work the same regardless of platform — the only difference is how you apply the fixes.
Step 1 — Run the audit on your profile
  1. Open the GBP Audit and enter your business.
  2. It pulls your live profile data from Google — rating, reviews, completeness, hours, photos, categories, popular times and 3-pack position.

Open the GBP Audit →

Step 2 — What we are trying to do

Your GBP is the primary Maps ranking signal. The goal is a complete, accurate, active profile — the audit shows exactly which fields are missing or weak versus competitors. All edits here are done in Google, not on your website.

Step 3 — Raise your completeness score
  1. Sign in at business.google.com and select your listing.
  2. Fill every gap the audit flags — primary and secondary categories, full opening hours, description, services and attributes.
Step 4 — Add photos and manage reviews
  1. Add quality, current photos — profiles with fresh images perform better.
  2. Respond to every review, good or bad. Quantity, recency and your responses are all signals.
Step 5 — Connect your profile to your website

Add your GBP sameAs link to your LocalBusiness schema and a visible “Find us on Google Maps” link in your footer (per-platform, as in the Local SEO guide). This two-way link strengthens the connection Google sees.

Step 6 — Compare with competitors and re-run

Use the competitor gap analysis to see where rivals beat you on reviews, categories or completeness. Close those gaps, then re-run the audit to confirm your completeness score and 3-pack position have improved.

Frequently asked questions

Do I need a Google Business Profile?

For any local business, yes — it is essential for Maps and local search visibility.

Does the audit use real Google data?

Yes — ratings, reviews, hours and 3-pack position come from live Google data.

What does it cost?

Pay-as-you-go, no subscription, credits never expire.

How do I check my site's GDPR privacy compliance?

The GDPR Audit checks any site for privacy-compliance signals — cookie banner, tracker detection, privacy policy, security headers and third-party domains — based on a live fetch of the page HTML. It is free to run. Follow the steps below. Start from the GDPR Audit.

How is your website built? Pick yours to see the right instructions throughout the steps:

You edit HTML files directly in Notepad++ and upload them via FileZilla. The steps below use this method by default.
In WordPress, most changes are made via Appearance → Theme Editor (for header/footer code) or a plugin like Yoast SEO or Rank Math for titles, descriptions and schema. The steps below will note the WordPress equivalent for each action.
In Wix, edit page titles and descriptions via Pages → Page SEO. Add code via Settings → Custom Code. Wix handles most technical basics automatically but has limited control over advanced schema and server files — you may need a Wix Developer account for those.
In Squarespace, edit page titles and descriptions via Pages → Page Settings → SEO. Add custom code via Settings → Advanced → Code Injection. Squarespace doesn't allow direct file uploads — use the URL Mapping feature or a custom domain redirect as a workaround.
In Shopify, edit page titles and descriptions via Online Store → Pages → Edit SEO. Add custom code via Online Store → Themes → Edit Code (theme.liquid for header code).
You have hosting with a control panel (cPanel or Plesk). Use the File Manager inside your control panel to upload and edit files directly in your browser — no FTP program needed. Find it under Files → File Manager in cPanel, or Files in Plesk. For editing, use the built-in code editor or download, edit in Notepad++, and re-upload.
If you're not sure, check your hosting provider's documentation for how to upload files and edit page code. The audit tools work the same regardless of platform — the only difference is how you apply the fixes.
Step 1 — Run the free audit
  1. Open the GDPR Audit, enter your URL and run it.
  2. It fetches your live page and inspects its privacy signals — this audit is free.

Open the GDPR Audit →

Step 2 — What we are trying to do

Highlight the likely privacy-compliance gaps on your page so you can close them. This is a technical signal check, not legal advice — for legal certainty consult a qualified adviser.

Step 3 — Add or fix your cookie banner

Tracking before consent is a common gap. Add a consent banner that blocks non-essential trackers until the visitor agrees.

  1. WordPress: a consent plugin (e.g. CookieYes, Complianz). Wix / Squarespace / Shopify: the built-in cookie-banner setting or an app.
  2. FileZilla / cPanel / Plesk: add a consent-management script before </head> in Notepad++.
Step 4 — Review your trackers and third-party domains

The audit lists the trackers and third-party domains your page loads — each may set cookies or collect data.

  1. Make sure every one is disclosed in your privacy policy and covered by consent.
  2. Remove any third-party scripts you do not actually need.
Step 5 — Add a privacy policy and security headers
  1. Add a clear privacy policy page and link it in your footer.
  2. Add the security headers the audit flags: cPanel / Plesk via server config or .htaccess; WordPress via a headers/security plugin; hosted platforms apply sensible defaults.
Step 6 — Re-run to confirm

After your changes, re-run the audit to confirm the banner, trackers, policy and headers now pass. Re-check whenever you add a new third-party script or analytics tool.

Frequently asked questions

Is this legal advice?

No — it is a technical signal check to highlight likely gaps. For legal certainty, consult a qualified adviser.

Is the GDPR Audit really free?

Yes — this audit is free to run.

What does it check?

Cookie banner, tracker detection, privacy policy, security headers and third-party domains, from a live fetch of your page.

All tools & audits

Every SEO, AEO and schema tool on the platform — each links straight to the audit.

AI Schema Generator

Generates complete, accurate JSON-LD schema from your live page content — 90+ types, no coding.

Schema Debugger

Scores your existing markup out of 100 against Google's rules and lists errors and warnings.

Schema Builder

Build any schema type by hand with guided fields and instant JSON-LD output.

Meta Analyzer

Checks your title and meta description length and quality with suggested rewrites.

Site Audit

Full on-page SEO, headings, schema and accessibility check for any URL.

Site Audit Pro

28 parallel checks: SEO, accessibility, schema, Lighthouse, backlinks, keywords, brand SERP and sentiment.

Local SEO Checker

Audits the 24 signals Google uses to rank businesses in the Maps 3-pack.

Geo-Grid

Runs a search from a 5×5 grid around your business and plots a ranking heatmap.

Core Web Vitals

Measures page speed and pinpoints what's slowing your page down.

Maps Audit

Live 3-pack ranking audit: who ranks, your position and the gap to reach #1.

Google Business Profile Audit

Live GBP check: rating, reviews, completeness, hours, photos and competitor gaps.

AEO Checker

Technical audit for AI citation readiness: bot access, FAQ/HowTo schema, question coverage.

E-E-A-T Checker

Grades Experience, Expertise, Authoritativeness and Trust signals with benchmarks.

Readability

Flags hard-to-read sentences and suggests clearer wording.

GDPR Audit

Checks cookie banner, trackers, privacy policy and security headers for compliance.

Backlink Tools

Full domain backlink summary, outbound link audit and AI link-building strategy.

Internal Link Analysis

Reviews every internal link: anchor text, structure, nofollow use and fixes.

HTTP Error Audit

Crawls up to 1,000 pages and surfaces every 400 and 500 error.

AI Agent Readiness Audit

16 signals across discovery files, content access, security headers and crawler permissions.

AI Visibility Tracker

Monitors whether your domain is cited in Google AI Overviews and AI Mode over time.

Website Trust Audit

0–100 trust score from WHOIS, Safe Browsing, backlink spam, identity and TLD risk.

From the blog

Setting the record straight on "scam-check" rating sites

A handful of automated "trust score" and "scam detector" websites have published low ratings of aiwebpageseo.com. We want to be completely open about what these sites actually are, what the independent evidence says, and why we believe their ratings are worthless. Click each one below for the facts and our full response.

Scam-Detector.com — rated us 15.5/100 with no evidence. Here's the truth.

What they published: An automated page labelling us "Controversial", "High-Risk" and "Unsafe", alleging "high-risk activity related to phishing, spamming" and malware, and a score of 15.5/100.

What the independent, recognised authorities actually say:

  • Google Safe Browsing — Google's official system that powers the unsafe-site warnings shown in Chrome, Firefox, Safari and Google Search — returns "No unsafe content found" for aiwebpageseo.com. This is the definitive authority on whether a site is dangerous, and it confirms we are not.
  • IPQualityScore (IPQS), a fraud-prevention provider used across the security industry, rates aiwebpageseo.com LOW RISK, with Phishing & Malware Detection: CLEAN, a Low Risk threat score, valid SPF & DMARC mail security, and confirms the domain is "primarily used for legitimate purposes."
  • Google and Bing both crawl and index aiwebpageseo.com normally and regularly. Search engines actively de-rank and warn against genuine phishing and malware sites — they do not index them as normal. This is a far more authoritative signal than any "trust score" algorithm.
  • The site uses a valid HTTPS certificate (Let's Encrypt) — a fact their own report confirms.
  • VirusTotal aggregates more than 90 independent security vendors. Not one flagged aiwebpageseo.com as malicious — the overwhelming majority (including Google Safebrowsing, Kaspersky, BitDefender, ESET, Fortinet, Sophos, Phishtank and OpenPhish) return a verdict of Clean. There are no phishing or malware detections whatsoever.
  • Spamhaus — one of the most respected threat-intelligence and blocklist authorities in the industry — shows no malicious detections for our server IP (87.106.96.71). This directly contradicts Scam-Detector's unevidenced claim that we were "detected on blacklist engines."
  • Sucuri SiteCheckNo malware found, no injected spam, no defacements, and not blacklisted (confirmed clean by Google Safe Browsing, McAfee, Sucuri Labs, ESET, PhishTank, Yandex and Opera).
  • URLVoid0 / 35 detections across its blocklist engines.
  • Norton Safe Web — rates aiwebpageseo.com Safe.
  • Cisco Talos — Web Reputation Neutral, and not on the Talos Security Intelligence block list.
  • MxToolbox blacklist check — clean on 68 of 70 blacklists, including every major one (Spamhaus ZEN, Spamhaus DBL, SpamCop, Barracuda, SORBS). The only two listings are UCEPROTECT Levels 2 and 3 — which do not list our site at all, but blanket-list entire hosting-provider IP ranges; our own IP is clean on UCEPROTECT Level 1.
  • We serve identical content to visitors and to search engines (no cloaking), run no malicious code, and never ask visitors for sensitive data. You can verify this yourself using the "Verify us" checks inside our audit tools.

Why their rating is, in our view, meaningless: Their own report admits — in writing — that their "investigation continues working to pinpoint the specific category." In other words, they branded us a phishing/malware/spam risk while simultaneously admitting they had identified no such activity. Their score is driven chiefly by one automated factor: our domain being newly registered (February 2026). A new domain is not evidence of wrongdoing — every legitimate business starts with one.

We are not alone, and this appears to be a pattern. Their own public Trustpilot reviews are filled with legitimate businesses reporting identical treatment — false "scam" labels, no supporting evidence, and the same "newly registered domain" excuse. It is our view that an automated site which publishes unsubstantiated "scam" and "high-risk" labels about real businesses — while earning money from affiliate links to security products, VPNs and data-removal services placed throughout those same warning pages — has a clear commercial incentive to alarm visitors, and is not a credible or authoritative source.

Don't take our word for it — read what other businesses say about them. You can see the pattern for yourself in their own independent reviews: Scam-Detector.com reviews on Trustpilot. There you will find numerous business owners describing the same experience — being falsely labelled, given no evidence, and in many cases reporting that the only way to improve the score is to engage with the site. We suggest you judge their credibility by what those affected by them have to say.

Our position: We have formally written to Scam-Detector.com requiring them to either produce specific evidence for every allegation — the phishing URL, the malware sample, the named blacklist — or withdraw the claims entirely. The burden of proof is theirs. We are confident in our business, our tools, and the independent data above, and we will continue to challenge false statements about us wherever they are published.
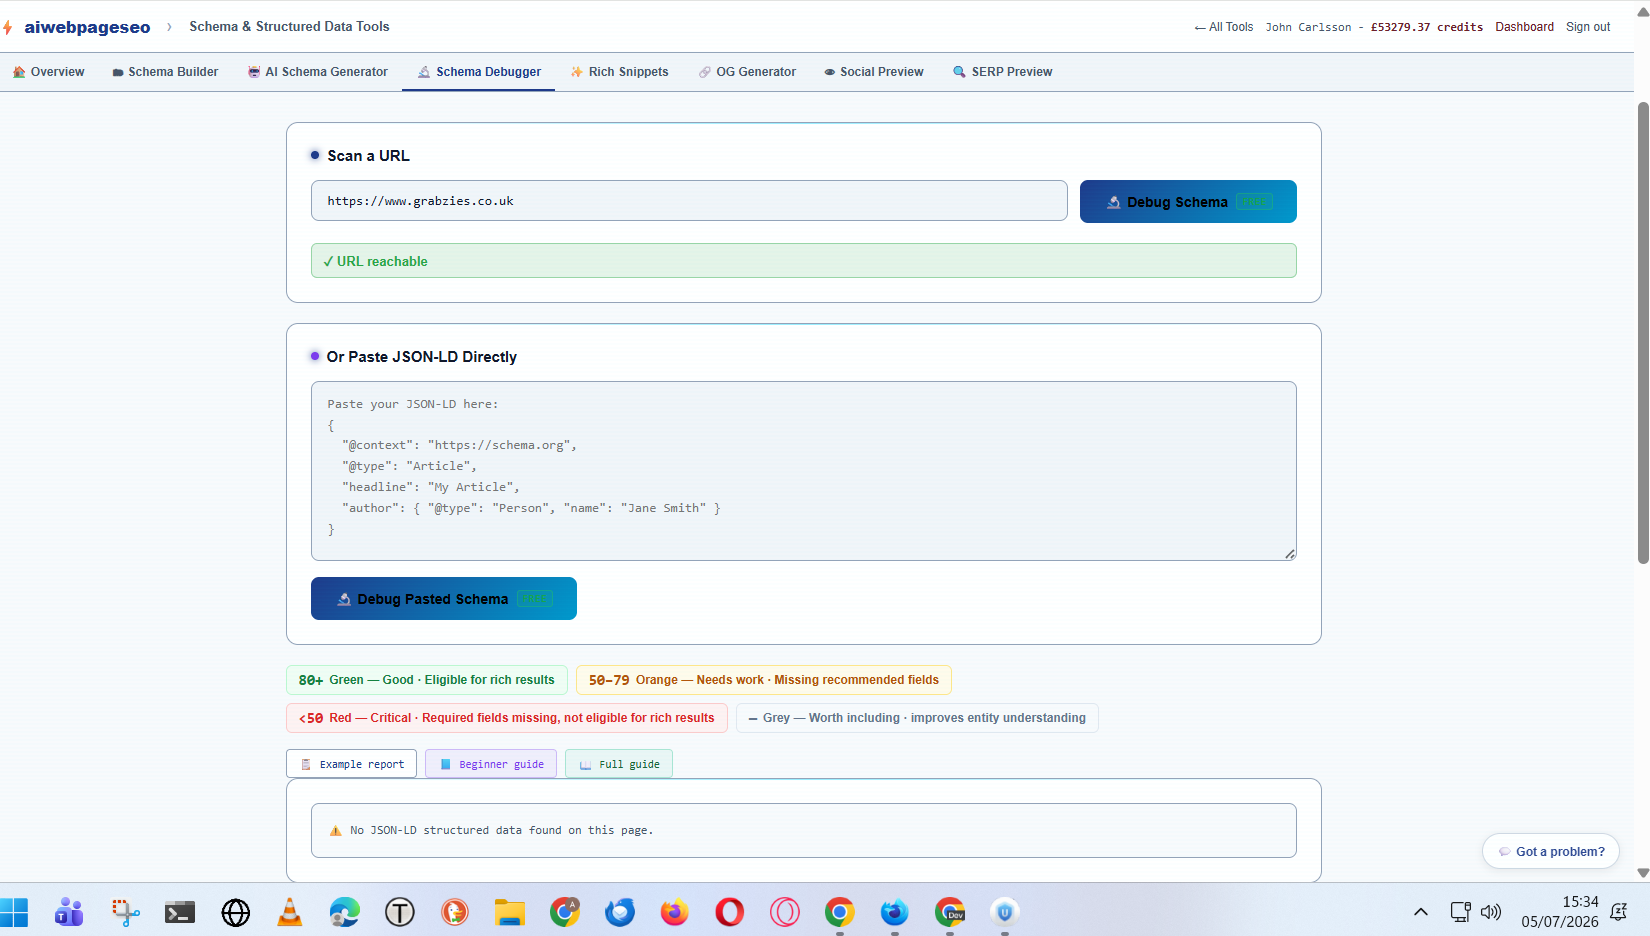
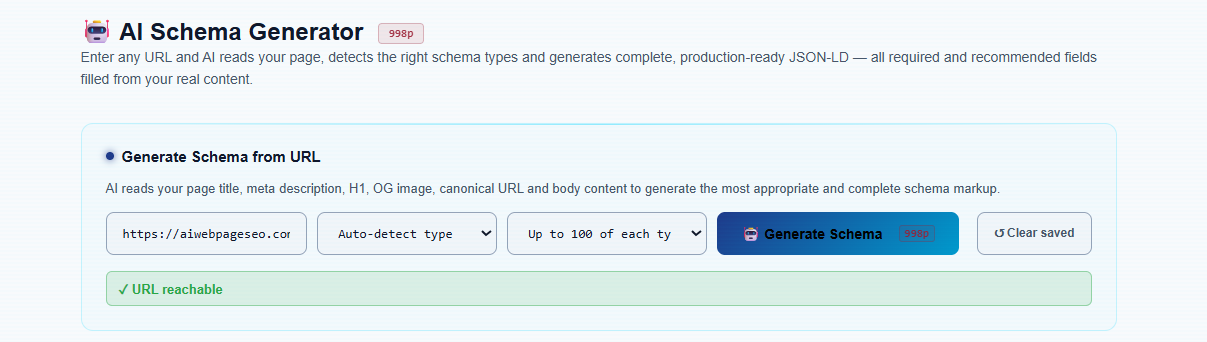
ScamAdviser.com — a low score built on non-issues. Read their own findings.

The most telling part of ScamAdviser's own report is what they list as "positive":

  • The SSL certificate is valid.
  • DNSFilter considers this website safe.

Their security checks are positive. So what dragged the score down? Their own "negative highlights" — none of which are evidence of any wrongdoing:

  • "The website's owner is hiding his identity on WHOIS using a paid service." — This is standard WHOIS privacy protection, used by millions of legitimate domain owners to prevent spam and protect personal data under GDPR. It is a normal, recommended setting, not concealment.
  • "This website does not have many visitors." — We are a recently launched business. Low traffic is what every new website starts with; it is not a sign of fraud.
  • "We found many low rated websites on the same server." — We use standard shared hosting (IONOS), like the overwhelming majority of small businesses. We have no control over, or connection to, other unrelated sites that happen to share the same hosting infrastructure. Penalising us for our neighbours is not a measure of our legitimacy.
  • "This website has only been registered recently." — The domain was registered in February 2026. A new domain is not evidence of a scam; every legitimate business begins with one.

In other words: ScamAdviser found nothing actually wrong with our site. Its own checks confirm valid SSL and that DNSFilter rates us safe. The low score is generated entirely from automated assumptions — privacy settings, being new, and shared hosting — that apply to countless legitimate businesses. As with all such automated "trust score" sites, we'd encourage you to weigh the verdicts of genuine security authorities instead: Google Safe Browsing, VirusTotal (90+ vendors), IPQS and Spamhaus all rate aiwebpageseo.com clean, as listed above.

So, to all those badly designed, wannabe "scam detection" sites running an automated script that flags every new business as a fraud and then sells antivirus, VPN and data-removal subscriptions off the back of the fear they manufacture: the genuine security authorities — Google, Norton, VirusTotal's 90+ vendors, Sucuri, Cisco Talos, IPQS and Spamhaus — have all checked us and found us clean. We'll let real customers and real data speak for us. The rest is, in our considered opinion, just noise.